Knowing how to record the iPhone screen can be very useful if you have an Apple smartphone, after all, this functionality can be used on several occasions.
Furthermore, having the knowledge on how to record the iPhone screen has become a necessity, whether to create tutorials, share gaming moments, demonstrate applications or even capture important moments.
Fortunately, Apple offers the functionality to easily capture content displayed on your devices. In this text, we will explore how to record the iPhone screen and how this function can be useful in various situations.
When did this functionality appear and what is it for?
Screen recording on iPhone emerged with iOS 11, released in September 2017. This feature was introduced to serve users who wanted to capture content displayed on their cell phones in a simple and convenient way.
The main purpose of screen recording on an iPhone is to allow users to record their interactions with the device by capturing videos of what is happening on the screen.
This can be useful in a variety of situations, from creating tutorials and demos, sharing gaming moments, to recording important information.
Uses and Benefits of iPhone Screen Recording
Knowing how to record the iPhone screen is highly necessary as this function brings several benefits to its users, such as:
Creating tutorials and demonstrations
iPhone screen recording is perfect for creating video tutorials, showing step by step how to use an app, configure a specific function or perform a certain task on the device.
It’s an effective way to share knowledge and help others.
Sharing gaming moments
Whether you want to show off your game performance, share tips and tricks, or simply record fun moments while gaming, screen recording is a great option for capturing and sharing your iPhone gaming sessions.
Recording important information
Screen recording can also be useful for recording important information such as video conversations, important calls, or even online transactions.
This can be useful for future reference or to document evidence if necessary.
Step by step how to record the iPhone screen:
Now that we’ve talked about the features of this action, let’s actually learn how to record the iPhone screen:
- Access the “Settings” app on your iPhone.
- Scroll down and tap “Control Center”.
- Under “Controls”, find “Screen Recording” and tap the green “+” icon on the left to add it to Control Center.
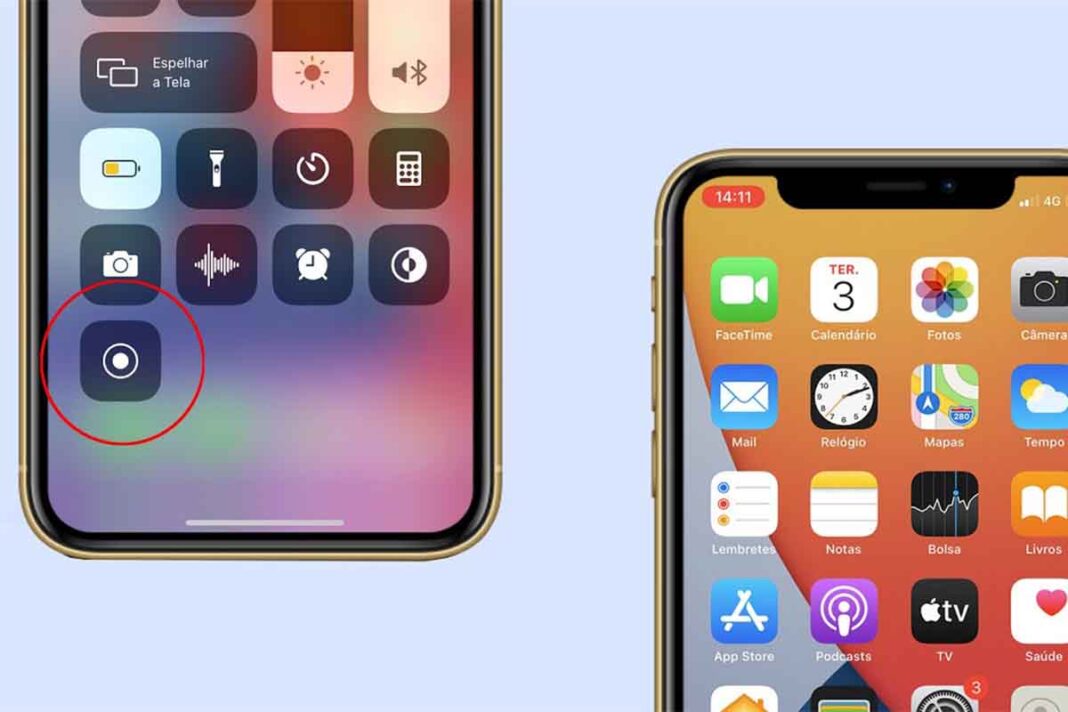
- Now, go back to your iPhone’s home screen and swipe up from the bottom (on older models) or from the top right corner (on newer models) to open Control Center.
- Tap the circle icon in the “Screen Recording” section to start recording. You will see a red time counter at the top of the screen.
- To stop recording, tap the red circle icon again. You can also tap the red status bar to pause or stop recording.
- The recording will be saved to your photo gallery.
What to do if you can’t record your iPhone screen
Although screen recording is a native functionality of the iPhone, in some cases problems may occur that prevent this function from working correctly.
If you are having difficulty recording your iPhone screen and the steps presented on how to record the iPhone screen are not working, here are some possible causes and efficient tips to solve this problem:
- Check your iPhone settings: First of all, it is important to ensure that your iPhone settings are correct to allow screen recording.
Access “Settings” and go to “Control Center”. Make sure the “Screen Recording” option is enabled. If it isn’t, activate it by tapping the “+” icon next to it.
- Restart your iPhone: Sometimes temporary issues can cause screen recording to fail. Restarting your iPhone can help resolve these issues.
Press and hold the sleep/unlock button (located on the side of the device) until the red “Power off” slider appears. Drag the slider to turn off your iPhone, then turn it back on by pressing the same button.
- Check the available space on your iPhone: If your device is low on storage space, screen recording issues may occur.
Make sure you have enough space on your iPhone to record. Delete unnecessary files or transfer them to iCloud or a computer to free up space.
- Update your iPhone’s software: Compatibility issues or bugs can be fixed with software updates. Make sure your iPhone is running the latest version of the iOS operating system.
Go to “Settings”, go to “General”, then tap “Software Update” to check for available updates.
- Restore factory settings: If all other solutions fail, you may need to restore your iPhone to factory settings.
This will remove all data and settings from the device, so it’s important to make a backup before proceeding.
Go to “Settings”, then “General”, tap “Reset” and select “Erase Content and Settings”. Follow the on-screen instructions to complete the restore process.
Conclusion
iPhone screen recording is a native functionality that allows users to easily capture content displayed on their devices.
With the possibility of creating tutorials, sharing gaming moments and recording important information, this function becomes extremely useful in various situations.
By following the above-mentioned step-by-step guide on how to record the iPhone screen, iPhone users can enjoy the benefits of screen recording, becoming more productive and making it easier to share valuable information.
Frequently asked questions on how to record the iPhone screen
- When was screen recording introduced since the first iPhone?
No. Screen recording was introduced on iPhone with iOS 11, released in September 2017.
- What is the purpose of screen recording on iPhone?
The purpose of screen recording on iPhone is to allow users to capture videos of content displayed on their devices, making it easier to create tutorials, share gaming moments, and record important information.
- Can I record the screen for game sharing?
Yes, the benefits of screen recording on iPhone include creating video tutorials, sharing gaming moments, and recording important information such as calls or online transactions.

